How To Wire a Network Cable: Easy Steps & DIY Guide

In today’s hyper-connected era, a robust and reliable network is non-negotiable. Imagine streaming, gaming, or working without interruptions—pure digital bliss. If you’ve ever struggled with connectivity issues, knowing how to wire a network cable can be a game-changer. It transforms your digital experience, ensuring consistent and high-speed internet access. With a few tools and a bit of know-how, you can master this essential skill, eliminating the frustration of weak signals and dropped connections. Dive into the intricacies of network wiring, and unlock the full potential of your internet connection today.
Table of Contents
What is an Ethernet Cable?
An Ethernet cable is a fundamental component in wired networking, providing a conduit for data transmission across devices. Unlike wireless connections, Ethernet cables offer unparalleled reliability and speed, crucial for demanding applications like streaming, gaming, and large file transfers. These cables, typically CAT5e, CAT6, or CAT7, consist of twisted pairs of copper wires that minimize electromagnetic interference, ensuring clear signal transmission. To wire a network cable properly, one must understand the various types and their specific applications. By mastering how to wire a network cable, you can customize cable lengths, optimize network performance, and create a stable, high-speed internet connection tailored to your needs.
Wiring an Ethernet Cable
Step 1: Get the Right Tools
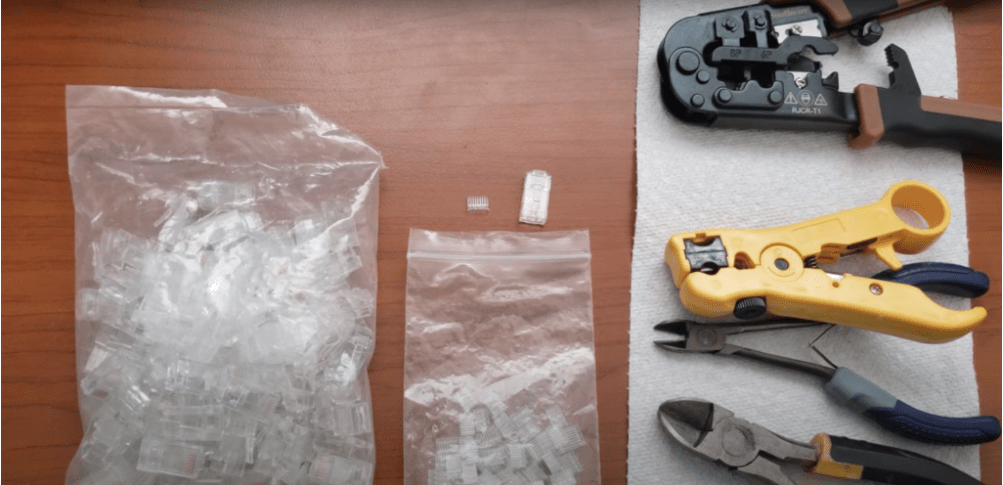
To wire a network cable effectively, assembling the right tools is crucial. Essential items include a quality crimping tool, precision wire strippers, and cutting tools for clean cuts. RJ45 connectors are necessary to terminate the cable ends. A cable tester is also indispensable to ensure the integrity of your connections. These tools not only streamline the process but also ensure a professional and reliable outcome. Investing in high-quality tools will make your task easier and the results more dependable, ensuring your network setup is efficient and robust.

Step 2: Measure Your Wire
Accurate measurement is pivotal when you wire a network cable. Start by determining the precise length needed for your setup, considering the distance between devices and any routing requirements. Use a measuring tape for exactness, and add a small margin to accommodate potential adjustments. This step prevents waste and ensures the cable is neither too short nor excessively long. Proper measurement is fundamental to achieving a tidy and efficient network layout, enhancing both performance and aesthetics.
Step 3: Cut and Strip Your Wire
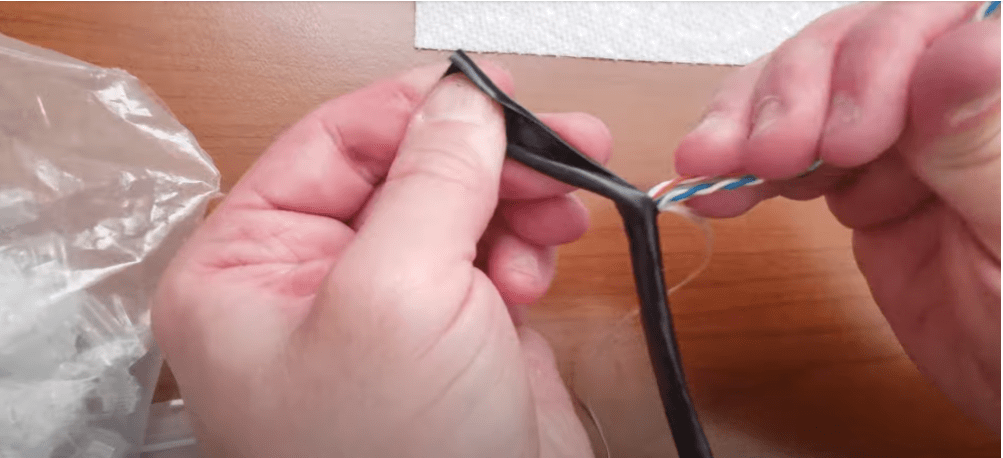
Once you’ve measured your cable, it’s time to cut and strip it. Use a sharp cutting tool to ensure a clean cut, reducing the risk of frayed ends. Stripping involves removing about an inch of the outer jacket to expose the inner wires without damaging them. Precision is key here; avoid nicking the internal conductors as it could impair the cable’s performance. Properly cutting and stripping your wire is a critical step when you wire a network cable, ensuring optimal connectivity and longevity of the network.

Step 4: Separate and Straighten Out the Individual Wires
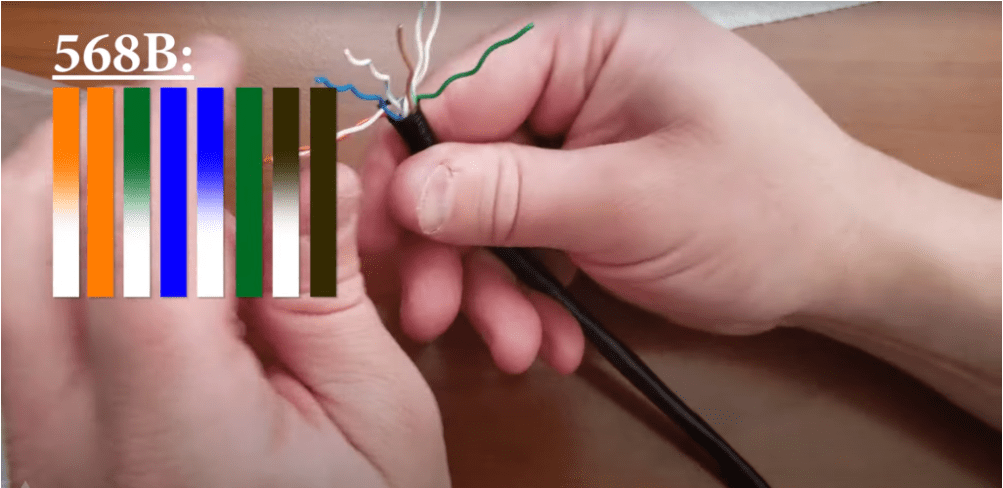
Inside the casing of an ethernet cable, you’ll discover four sets of twisted pairs, totaling eight wires. Each pair adheres to a specific color scheme, which aids in proper identification and arrangement:
- Blue and blue/white
- Brown and brown/white
- Green and green/white
- Orange and orange/white
To proceed with wiring a network cable, carefully untwist each pair of wires and straighten them out. This meticulous preparation ensures that when you align them, you’ll easily place them in the correct order within the ethernet socket head. Straightening the wires facilitates accurate configuration, enabling smooth connectivity and optimal data transmission through the cable.
Step 5: Put the Wires into the Correct Order
Once you have straightened out your wires, arrange them in the specified order from left to right within the ethernet cable:
- Orange/white
- Orange
- Green/white
- Blue
- Blue/white
- Green
- Brown/white
- Brown
Initially, it might be challenging to keep the wires in their correct positions. However, with patience and careful handling, they will eventually settle into place. This orderly arrangement is crucial for ensuring that each wire makes the right connection within the ethernet socket head, maintaining reliable performance and efficient data transmission across your network.

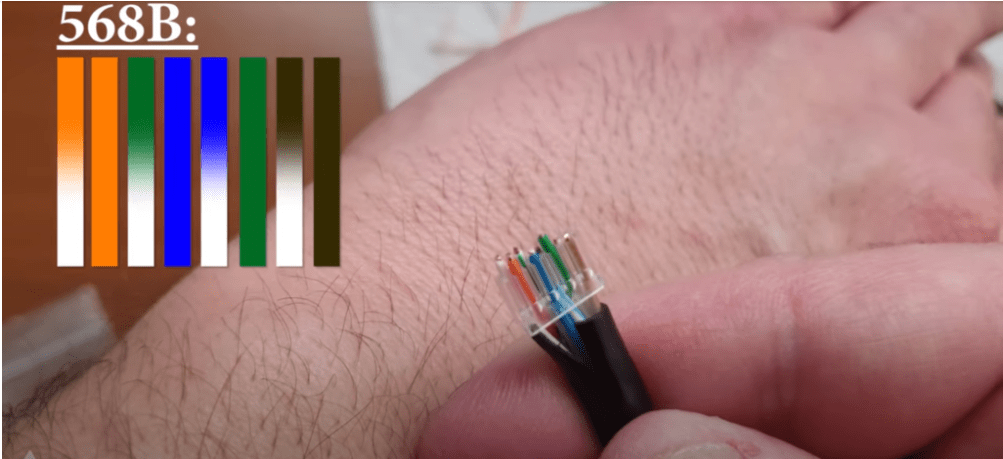
Step 6: Insert the Wires into the Ethernet Socket Head
- Inserting the wires into the Ethernet socket head is crucial when you wire a network cable.
- Ensure each conductor is meticulously guided into its designated slot within the connector.
- Proper alignment of the wires is essential to establish a secure and reliable connection.
- This step facilitates seamless data transmission by ensuring optimal contact with the connector’s terminals.

Step 7: Double Check the Order of the Wires
- Before proceeding, it’s critical to double check the order of the wires within your network cable.
- This step ensures that each wire is correctly aligned according to the chosen wiring standard, whether T568A or T568B.
- Verification of the sequence is essential to avoid misalignment, which can hinder connectivity.
- Take time to meticulously review the placement of each conductor, ensuring they are in the right position.
- Proper ordering of the wires guarantees efficient data transmission and reliable network performance.
Step 8: Crimp the Wires
- Crimping the wires is a critical step in wiring a network cable.
- Utilize a precision crimping tool to secure the conductors firmly within the network cable connector.
- This ensures reliable contact between the wires and the connector pins.
- Proper crimping is essential for maintaining signal integrity and preventing interference.
- Mastering this technique guarantees a stable network connection with optimal performance.
Step 9: Test Your Cable
- Testing your network cable is a crucial final step when you wire a network cable.
- Use a specialized cable tester to ensure optimal performance.
- Verify connectivity and correct wiring of all conductors.
- Detect any issues such as short circuits or miswiring that could affect signal transmission.
- Testing confirms compliance with industry standards, ensuring a stable network connection.
Conclusion
In conclusion, mastering the art of wiring a network cable is pivotal for anyone looking to establish robust network connectivity. Each step, from selecting the appropriate tools to crimping the wires and testing the final connection, ensures reliable data transmission and signal integrity. Attention to detail during preparation and installation is crucial for optimizing network performance and preventing interference. By adhering to industry standards and employing advanced techniques, you can create networks that support high-speed digital communication with ease. Mastering these skills empowers you to build and maintain efficient network infrastructures tailored to modern technological demands.


One Comment